

Have you heard about Ooblets? Per their website, "Ooblets is an upcoming farming, creature collection, and town life indie game inspired by Pokémon, Harvest Moon, and Animal Crossing. Manage your farm, grow and train your ooblets, explore strange lands, and battle wild ooblets and other ooblet trainers." Creature collection?? I'm in! And as you know I'm in love with cacti (fortunate since I live in the desert). So when I saw Bristlebud, I fell in love and had to make one. If you feel the same, here is a pattern to make your own. This one is not as easy as my other patterns, so take it slow and feel free to comment here or on Facebook if you need some help!
Bristlebud
Character by Ooblets / Glumberland LLC
This pattern is written, created, published, and illustrated by The Craftzilla. Please do not sell, copy or separately redistribute this pattern or any parts therein (share the blog page link instead!) I do not own Ooblets or the design of Bristlebud, so do not sell final creations. These are for personal fanworks only. Thank you!Materials needed:
3.5 E sized hook
Green yarn
Light green yarn
Brown yarn
Light brown yarn
Peach felt and felting needle
or Peach colored yarn
6 mm safety eyes
Pale yellow yarn/thread
Red embroidery thread and needle
Scissors
Yarn needle
Hot glue gun
Stitches (US)
mc = magic circle
inc = two stitches in the same stitch of previous round/row
dec = one stitch over two stitches of previous round/row
sc = single crochet
dc = double crochet
hdc = half double crochet
sl st = slip stitch
bl only = crochet in back loops only
fl only = crochet in front loops only
( ) = number of stitches in round
** = sequence of stitches to be repeated
Main Body/Head
In green yarn, make one

Row 1: Chain 20, turn, and insert hook into second ch from hook. Hdc down the chain (19 hdc)
R2: Chain 2, turn (so you are flipping it over horizontally) and hdc in back loops only in each stitch (19)
R3: Chain 2, turn, and hdc in back loops only in each stitch (19)
Switch to light green yarn. (You are doing 3 rows of hdc in each color three times)
R4: Chain 2, turn, and hdc in back loops only in each stitch (19)
R5: Chain 2, turn, and hdc in back loops only in each stitch (19)
R6: Chain 2, turn, and hdc in back loops only in each stitch (19)
Switch back to original green color yarn.
R7: Chain 2, turn, and hdc in back loops only in each stitch (19)
R8: Chain 2, turn, and hdc in back loops only in each stitch (19)
R9: Chain 2, turn, and hdc in back loops only in each stitch (19)
Switch to light green yarn.
R10: Chain 2, turn, and hdc in back loops only in each stitch (19)
R11: Chain 2, turn, and hdc in back loops only in each stitch (19)
R12: Chain 2, turn, and hdc in back loops only in each stitch (19)
Switch to green yarn.
R13: Chain 2, turn, and hdc in back loops only in each stitch (19)
R14: Chain 2, turn, and hdc in back loops only in each stitch (19)
R15: Chain 2, turn, and hdc in back loops only in each stitch (19)
Switch to light green yarn.
R16: Chain 2, turn, and hdc in back loops only in each stitch (19)
R17: Chain 2, turn, and hdc in back loops only in each stitch (19)
R18: Chain 2, turn, and hdc in back loops only in each stitch (19)
Fasten off, leave a long tail of yarn. Using your yarn needle, sew the edge you just completed to your first row, making a tube. (so that the stripes are vertical)

Now fasten some yarn to the top of your tube to crochet with. I alternated colors, but it wouldn't be too noticeable if you just used one green. Along the top:
R19: *Hdc dec, hdc* 6 times (12)
That should taper the top of your tube a bit. Fasten off and leave a tail of yarn.
Using your yarn needle and the tail of yarn, insert needle under and through the front loops only of those twelve stitches and pull tight, closing the hole. Knot it and secure thread, hide the remaining tail of yarn within the body. Stuff partially.

Is it starting to look like a fat pickle? Then things are going perfectly!
We are going to make the buds that go on their head the same way we made the body, just on a much smaller scale.
Thin long bud
In green yarn
Row 1: Chain 8, turn, and insert hook into second ch from hook. Hdc down the chain (7)
Switch to light green (You are doing 1 row of hdc in each color three times)
R2: Chain 2, turn (so you are flipping it over horizontally) and hdc in back loops only in each stitch (7)
Switch back to original green
R3: Chain 2, turn, and hdc in back loops only in each stitch (7)
Switch to light green yarn.
R4: Chain 2, turn, and hdc in back loops only in each stitch (7)
Switch to green.
R5: Chain 2, turn, and hdc in back loops only in each stitch (7)
Switch to light green yarn.
R6: Chain 2, turn, and hdc in back loops only in each stitch (7)
Fasten off, leave a long tail of yarn. Using your yarn needle, sew the edge you just completed to your first row, making a tube. (so that the stripes are vertical)
We are not doing any stitches on the top like we did with the body, so go ahead and whip stitch the top closed, meaning, using your yarn needle and the tail of yarn, insert needle under and through the chains that we made between the rows or wherever along that unfinished edge on top of the tube and pull tight to close the hole.
Again, does it look like a pickle? Then we're good! Let's make the fat short bud now.

Fat short bud
In green yarn
Row 1: Chain 6, turn, and insert hook into second ch from hook. Hdc down the chain (5)
R2: Chain 2, turn (so you are flipping it over horizontally) and hdc in back loops only in each stitch (5)
Switch to light green (You are doing 2 rows of hdc in each color three times)
R3: Chain 2, turn and hdc in back loops only in each stitch (5)
R4: Chain 2, turn and hdc in back loops only in each stitch (5)
Switch to original green color
R5: Chain 2, turn and hdc in back loops only in each stitch (5)
R6: Chain 2, turn and hdc in back loops only in each stitch (5)
Switch to light green.
R7: Chain 2, turn and hdc in back loops only in each stitch (5)
R8: Chain 2, turn and hdc in back loops only in each stitch (5)
Switch to original green color
R9: Chain 2, turn and hdc in back loops only in each stitch (5)
R10: Chain 2, turn and hdc in back loops only in each stitch (5)
Switch to light green.
R11: Chain 2, turn and hdc in back loops only in each stitch (5)
R12: Chain 2, turn and hdc in back loops only in each stitch (5)
Fasten off, leave a long tail of yarn. Using your yarn needle, sew the edge you just completed to your first row, making a tube. (so that the stripes are vertical)
Whip stitch the top closed, meaning, using your yarn needle and the tail of yarn, insert needle under and through the chains that we made between the rows or wherever along that unfinished edge on top of the tube and pull tight to close the hole.
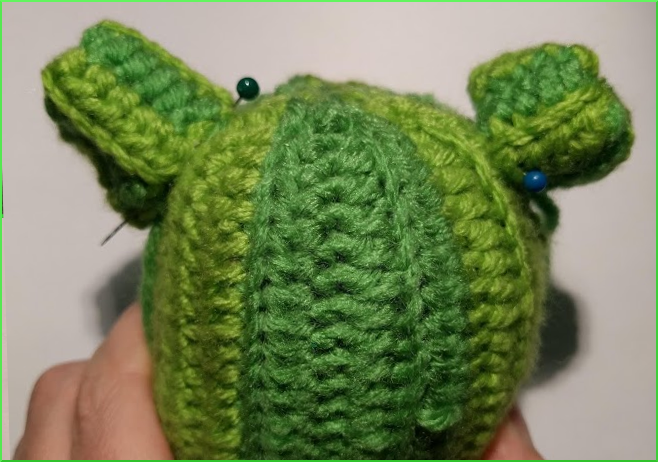
Pin the buds according to the photo, with the skinny bud on the left and the fat one on the right. Place a bit of stuffing inside each and sew onto the top of the body/head.
Face
Two ways to go about this. I preferred the look of the felt.
Take some peach colored felt, cut it into an oval, and make two slits for the safety eyes. Place felt onto upper center front of Bristlebud's body/head on a regular green stripe. Place safety eyes through the felt and crocheted layer, and fasten. Stuff Bristlebud with poly fill, then use a felt needle to secure felt to face. (Can also be hot glued. Top crochet in alternating colors around the face. Add a mouth with a needle and embroidery thread if desired.
--Or--
In peach yarn,
Round 1: Working in a spiral, place 6 sc in a magic circle (6)
R2: Inc every stitch (12)
R3: Inc every other stitch (18)
Switch to green yarn
R4: Hdc around (18)
Fasten off leaving a tail of yarn for sewing.
Place safety eyes through face layer and crochet body on a regular green stripe, fasten. Sew face onto body.


Bottom
In brown yarn
Round 1: Working in a spiral, place 8 hdcc in a magic circle (8)
R2: Inc every stitch (16)
R3: Inc every other stitch (24)
R4: *Hdc, hdc, inc* eight times (32)
R5: *Hdc, hdc, hdc, inc* eight times (40)
R6: Hdc around (not sc!) (40)
Time for some craziness. We are making that jagged edging on Bristlebud now. Working in the front loops (we'll use the back loops for the light brown layer!), here's the stitch
R7: In front loops only!*Skip a stitch, slip stitch two together, skip a stitch, in the next stitch dc twice chain 2 sl st into second ch from hook dc twice into original st* around.

Here's a doodle to hopefully explain better! You just want to create a bunch of triangles. If slip stitching two together is too hard you can sc two together but the triangles won't be as tall looking.

Fasten off and leave a tail for sewing later Switch to light brown and do the same thing but in the back loops that you left open.

R8: In back loops from hdc row only!*Skip a stitch, slips stitch two together, skip a stitch, in the next stitch dc twice chain 2 sl st into second ch from hook dc twice into original st* around.
Fasten off. Stuff the green body of the Bristlebud firmly, and pin the bottom over the open part of the body. Using the brown tail of yarn, sew the two parts together. Push in more stuffing as needed.
Feet
In light green, make two
Ch 6, turn, in second ch from hook, inc, sc, sc, sc, inc, and now going down the other side of the chain, sc, sc, sc, inc. Sl st to first sc, fasten off leaving a tail of yarn to sew with.
Pin to bottom of Bristlebud and sew on flat.
Arms
In light green yarn, make two
Round 1: Working in a spiral, place 6 sc in a magic circle (6)
R2: Inc in every other stitch (9)
R3: Sc around (9)
R4: Dec in every other stitch (6)
R5: Sc around (6)
Fasten off, leave tail for sewing. Do not stuff. Press flat and sew onto body on light green stripes under and to the side of the face.

For the needles, latch hook little pieces of yarn around Bristlebud. Place longer pieces on top of the buds. I used a tiny bit of hot glue to seal the ends of yarn and secure them in place, since my first Bristlebud's needles are fraying already!

Enjoy your new buddy! Please let me know of any errors. I have no proof readers for my patterns, so I may have missed something. Comment, message me on facebook, or email thecraftzilla@gmail.com if you have any issues.
Have a wonderful day!!
Rachel
The Craftzilla

These are TOO cute! I LOVE cacti and I'm gonna have to make these cuties for me!! Thank you so much for this adorable pattern! =)
ReplyDelete