VALIDATED.
Showing posts with label childhood. Show all posts
Tuesday, February 12, 2019
Luma from Mario Galaxy
Labels:
childhood,
Christmas,
crafts,
craftzilla,
crochet,
mario,
plush,
plushie,
super smash bros,
toy,
video games
Saturday, August 11, 2018
Sleeping Eevee and Pikachu
Everyone is going on about the upcoming Pokemon games, Let's Go! Eevee & Pikachu! But did anyone ask Eevee and Pikachu if they wanted to go?
Labels:
amigurumi,
childhood,
children,
eevee,
pikachu,
plushie,
pokemon,
pokemon go,
pokemon lets go,
video games
Wednesday, June 6, 2018
Another Day, Another Charmander
By far, the Pokemon I've crocheted the most is Charmander. I made a Bulbasaur for my nephew a while back when he was first born. Well, I didn't know how to crochet when his older brother was initially born, so 5 years later, he gets a Charmander to match with his brother's Pokemon.
I used that Blue Phone Studios T-Rex pattern again, but altered the head to make it more Charmander like, as well as omit the stripes and add on the yellow tummy.
He has a jingle bell sealed inside a capsule placed inside his tummy so he jingles when you shake him, just like the Bulbasaur I made. I love that he stands up on his own (amigurumi with tails are great for this).
I hope you are all well!
I used that Blue Phone Studios T-Rex pattern again, but altered the head to make it more Charmander like, as well as omit the stripes and add on the yellow tummy.
He has a jingle bell sealed inside a capsule placed inside his tummy so he jingles when you shake him, just like the Bulbasaur I made. I love that he stands up on his own (amigurumi with tails are great for this).
I hope you are all well!
The Craftzilla
Friday, December 9, 2016
Charmander Pokemon Crochet Pattern
These Charmanders are stocking stuffers for a class at a local school who were in need of some cheering. I specifically designed them to be easy to make and easy to give away.
I wanted a quick, cute, and efficient Pokemon pattern. Something that kids would recognize, or if they didn't know Pokemon, would still like. Oddish, Poliwag, Voltorbs, all those round, easier Pokemon were a no-go. I finally settled on Charmander. Even if you didn't know or like Pokemon, he could still be thought of as a dragon or dinosaur. Also, he is DARLING so there.
So after creating NINE of him and tweaking the pattern over and over, here it is! His body and head are connected, saving some time. I did some facial sculpting just by weaving yarn back and forth through his eye sockets, but if you like the straight forward approach you can omit that.
I wanted a quick, cute, and efficient Pokemon pattern. Something that kids would recognize, or if they didn't know Pokemon, would still like. Oddish, Poliwag, Voltorbs, all those round, easier Pokemon were a no-go. I finally settled on Charmander. Even if you didn't know or like Pokemon, he could still be thought of as a dragon or dinosaur. Also, he is DARLING so there.
So after creating NINE of him and tweaking the pattern over and over, here it is! His body and head are connected, saving some time. I did some facial sculpting just by weaving yarn back and forth through his eye sockets, but if you like the straight forward approach you can omit that.
Friday, September 23, 2016
Another Michelangelo TMNT
You know, Teenage Mutant Ninja Turtles have lasted a long time. I remember watching them in the early 90s on tv, renting their slightly creepy movies from VideoTime, and then they died out until about 2012 when they revived for a while. I watched those episodes religiously with my brother. I drew fanart, wrote fanfics, talked all about them in the deviantart groups... good times. Again, it dwindled out and the new movies have been really blah. But now Nickelodeon has brought them back again with their cutesy eyes and big feet. I think they are really cute, and I wish I had cable to watch an episode or two. Anyways, I received another commission for Michelangelo, but with a few changes from the previous one I had made. This one is much bigger and a little bit more smug.
Monday, August 10, 2015
TMNT - Enter Michelangelo!
I love Teenage Mutant Ninja Turtles. It is embarrassing how much I loved them in 8th-9th grade. My little brother was creeped out by how much I obsessed about the run of the show at that time. The writing was really good at the time and the voice actors made the show super enjoyable. I had a diary that was actually more like an episode summary book for my subsequent geocities webpage for the series.
Bulbasaur
I've gained two nephews already this year! They sure are cute, and babies mean baby gifts. Which means forcing people to enjoy my hobby by crocheting said gifts.
Thursday, June 11, 2015
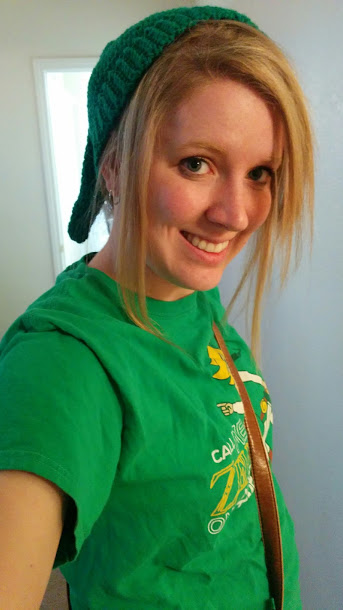
Link's Hat
I will take any excuse to dress up as Link. The Legend of Zelda : Symphony of the Goddesses Master Quest performance is probably one of my better reasons for dressing as Link.
Round 34: Sc around
Row 35: Chain 6 (or desired length of ribbing plus 1 ch). Turn and sc into the second ch from your hook. Continue down the chain (back loops only) (5)
Row 36: Sc the next two stitches (on the hat, not on your ribbing) together. Turn without a chain and sc back up the ribbing ONLY in the back loops. (5)
Row 37: Ch 1, turn, and sc down the ribbing again only in the back loops. The last stitch tries to hide itself, so make sure you end up with 5 sc each time.
The music was SO GOOD. I wish people would've saved clapping and cheering for in between songs, as I was there to HEAR the music. Lots of nostalgia washed over me as I listened. Particularly, I remember when my older brother was about to beat Ganondorf in Ocarina of Time. My entire family sat down on the couch and ate popcorn and cheered him on. It was a family event to play Legend of Zelda! So I always have good memories when I listen to that music. Ahhhhh...
Anyways, before I ramble too much, here's what I made.
This pattern is super flexible--I literally was winging it the entire time--so this pattern is more of a guide rather than a perfected pattern to making your own. I was working with stash yarn, so I made mine shorter than most Link hats. This is more Link to the Past looking.
Measure your
head beforehand to get an idea of how many stitches your final length needs to
be. I have a large head for a girl, and I needed 72 stitches in the end.
Note
that I made this with HDC stitches. You can either work in a spiral like me, or
use a tutorial on how to get a straighter seam while using HDC. Crochet Ever After has a good one.
**If you want the tail longer, do 2 of every HDC around row. It'll get adult Link cap size.**
H hook in green yarn
Round 1: 6 hdc in mc (6)
Round 2: *HDC, inc* x 3 (9)
Round 3: HDC around (9)
Round 4: *2 HDC, inc* x 3 (12)
Round 5: HDC around (12)
Round 6: *3 HDC, inc* x 3 (15)
Round 7: HDC around (15)
Round 8: *4 HDC, inc* x 3 (18)
Round 9: HDC around (18)
Round 10: *5 HDC, inc* x 3 (21)
Round 11: HDC around (21)
Round 12: *6 HDC, inc* x 3 (24)
Round 13: HDC around (24)
Round 14: *7 HDC, inc* x 3 (27)
Round 15: HDC around (27)
Round 16: *8 HDC, inc* x 3 (30)
Round 17: HDC around (30)
Round 18: *9 HDC, inc* x 3 (33)
Round 19: HDC around (33)
Round 20: *10 HDC, inc* x 3 (36)
Round 21: HDC around (36)
Round 2: *HDC, inc* x 3 (9)
Round 3: HDC around (9)
Round 4: *2 HDC, inc* x 3 (12)
Round 5: HDC around (12)
Round 6: *3 HDC, inc* x 3 (15)
Round 7: HDC around (15)
Round 8: *4 HDC, inc* x 3 (18)
Round 9: HDC around (18)
Round 10: *5 HDC, inc* x 3 (21)
Round 11: HDC around (21)
Round 12: *6 HDC, inc* x 3 (24)
Round 13: HDC around (24)
Round 14: *7 HDC, inc* x 3 (27)
Round 15: HDC around (27)
Round 16: *8 HDC, inc* x 3 (30)
Round 17: HDC around (30)
Round 18: *9 HDC, inc* x 3 (33)
Round 19: HDC around (33)
Round 20: *10 HDC, inc* x 3 (36)
Round 21: HDC around (36)
At this point I thought the “tail” of the hat was long
enough and added more stitches helter-skelter to fit my actual head.
Round 22: *5 HDC, inc* (42)
Round 23: *6 HDC, inc* (48)
Round 24: *7 HDC, inc* (54)
Round 25: *8 HDC, inc* (60)
Round 26: *9 HDC, inc* (66)
Round 27: *10 HDC, inc* (72)
Round 23: *6 HDC, inc* (48)
Round 24: *7 HDC, inc* (54)
Round 25: *8 HDC, inc* (60)
Round 26: *9 HDC, inc* (66)
Round 27: *10 HDC, inc* (72)
I wanted my hat to sit just behind my ears rather than snug
over the top of my head, so at this point I added just enough rows to sit an
inch away from my ears. The ribbing we add on will make up that last bit of
length. Add more or less rows to your taste.
Round 28-33: HDC around (72)
Ribbing can be longer or shorter depending on your
preference. I wish I had added one row of sc stitches before doing the ribbing
for a cleaner look, but the image above does NOT include the row of sc.
Round 34: Sc around
Ribbing begins
Row 35: Chain 6 (or desired length of ribbing plus 1 ch). Turn and sc into the second ch from your hook. Continue down the chain (back loops only) (5)
Row 36: Sc the next two stitches (on the hat, not on your ribbing) together. Turn without a chain and sc back up the ribbing ONLY in the back loops. (5)
Row 37: Ch 1, turn, and sc down the ribbing again only in the back loops. The last stitch tries to hide itself, so make sure you end up with 5 sc each time.
Repeat rows 36-37 until you have covered the entire brim of
your hat. You can fasten off and sew the edges together, or hold both ribbed
edges together and sc through them.
Good luck in making your own. It sure was fun to be one of the many Links in the audience. :)
Labels:
childhood,
craftzilla,
crochet,
hat,
legend of zelda,
pattern,
video games
Monday, April 6, 2015
Pokemon for Easter
Guys, I never grew out of liking Pokemon. Even when my daughter was born, I had Pokemon White on the Nintendo DS to play as I recovered from a c-section. While I don't clock in the hours I used to back in the 90's, I still have fond memories of the characters. So when my siblings visited me for Easter, I decided their baskets each needed their own starter Pokemon.
Labels:
amigurumi,
childhood,
craftzilla,
crochet,
Easter,
pokemon,
video games
Tuesday, March 17, 2015
An Easter Duck Pattern
![]() |
| So Google's autoawesome feature made this photo all pretty. Can't argue with that! |
Wednesday, January 7, 2015
Conversation Heart Headbands
My older brother is infamous for his love of conversation hearts. It has to be a certain brand and it has to be the small ones, but when he has a bag of them he will eat.them.all. He would eat them all year round if he could. This worked to my advantage on Valentine's day, as I would only eat the orange ones (they tasted the least like chalk?). So I had some tradeable goods for his fun dips and pixie sticks.
So when I think of Valentine's day, as much as I love red and hot pink, I love the pastel colors that remind me of my sugar filled childhood.
These headbands are simple, but cute. I like that they are a bit daintier than other headbands I've made. I can do them in any color, but these were the ones I liked the best. As for my favorite orange flavor--the color yarn for those would be too peachy, so I stuck with these.
Everything was pretty simple--I actually just chained a length of yarn, then applied shell edging around the whole thing, like I would on a blanket. It gives it a nice touch of stretch.
As for the hearts, can you tell I enjoyed making them? There are tons of resources online to make hearts, I hope to try some of the more complicated ones, but these are simply:
Magic circle (All About Ami's magic circle tutorial)
Chain 3
3 triple crochet into circle,
3 double crochet into circle,
1 triple crochet into circle,
3 double crochet into circle,
3 triple crochet into circle,
chain three,
slip stitch into circle, fasten off.
Pull the original thread tight and knot it and VOILA you are a heart making MACHINE!
Have fun!
Email me at thecraftzilla@gmail.com or message me on The Craftzilla's facebook page to ask about having a headbands made for you! I'm hoping to get these on the Etsy store soon. :)
So when I think of Valentine's day, as much as I love red and hot pink, I love the pastel colors that remind me of my sugar filled childhood.
These headbands are simple, but cute. I like that they are a bit daintier than other headbands I've made. I can do them in any color, but these were the ones I liked the best. As for my favorite orange flavor--the color yarn for those would be too peachy, so I stuck with these.
Everything was pretty simple--I actually just chained a length of yarn, then applied shell edging around the whole thing, like I would on a blanket. It gives it a nice touch of stretch.
As for the hearts, can you tell I enjoyed making them? There are tons of resources online to make hearts, I hope to try some of the more complicated ones, but these are simply:
Magic circle (All About Ami's magic circle tutorial)
Chain 3
3 triple crochet into circle,
3 double crochet into circle,
1 triple crochet into circle,
3 double crochet into circle,
3 triple crochet into circle,
chain three,
slip stitch into circle, fasten off.
Pull the original thread tight and knot it and VOILA you are a heart making MACHINE!
Have fun!
Email me at thecraftzilla@gmail.com or message me on The Craftzilla's facebook page to ask about having a headbands made for you! I'm hoping to get these on the Etsy store soon. :)
Wednesday, July 2, 2014
My Childhood in Yarn-form
Subscribe to:
Posts (Atom)