

Showing posts with label hat. Show all posts
Showing posts with label hat. Show all posts
Wednesday, December 23, 2015
Tuesday, June 23, 2015
Triceratops Hat, Tail, and Shoe Covers
Once upon a time, I was in college and had a huge crush on my brother's room mate. One day, we were with a group of friends and we were discussing our favorite books. I kid you not, in unison, the room mate and I said "Jurassic Park". Well, fast forward 6 years. Now married and with a kid of our own, we are still big Jurassic Park fans. So this year for our local comic con, we dressed up as Dr. Alan Grant, Dr. Ellie Sattler, and a triceratops.


See? Hardly any difference, except we don't have a sick dinosaur, but a healthy, albeit slightly grumpy, dinosaur.
We had the outfit already for Emmy (the shirt says "T-Rex tours" and she was originally get a safari hat and badge) but I REALLY wanted her to be a dinosaur. So I made up some accessories.
The hat was a gamble, since Emmy hates wearing them usually. She put up with it for a few photos here and there, but largely kept it off. I don't really blame her. I made a half double crochet beanie and made the frill separately. I just crocheted in rows till I had a decent height, then changed colors and did a shell edging. Three crocheted cones later, we have a horned dinosaur hat.
The shoe covers were made the morning of the convention. I didn't want her in crocheted booties on the convention floor/in the parking lot, so I completely winged some covers to go over her sandals. Note--crochet does not like velcro. Ugh. But they were pretty cute!

The tail has a chain as a belt to hang on her hips. It was stinking cute to see her running around with that tail flapping behind her.
We had such a great time at the con and were recognized by a few folks. More people remembered Dr. Alan Grant's name than Ellie's. I'm the gal who sticks her arm into the giant pile of dinosaur dung, remember?? No??
I'll have to do a follow up post with all the loot we bought and all the great crafters we met there. Not to mention we saw some fantastic costume construction and design--wish I had taken more photos, but I was chasing Emmy around half the time.
Want a triceratops hat/tail of your own? Email me thecraftzilla@gmail.com or message me on my Facebook page. I'm also on tumblr, but that gets a little random at times. :)
Thursday, June 11, 2015
Link's Hat
I will take any excuse to dress up as Link. The Legend of Zelda : Symphony of the Goddesses Master Quest performance is probably one of my better reasons for dressing as Link.


Round 34: Sc around
Row 35: Chain 6 (or desired length of ribbing plus 1 ch). Turn and sc into the second ch from your hook. Continue down the chain (back loops only) (5)
Row 36: Sc the next two stitches (on the hat, not on your ribbing) together. Turn without a chain and sc back up the ribbing ONLY in the back loops. (5)
Row 37: Ch 1, turn, and sc down the ribbing again only in the back loops. The last stitch tries to hide itself, so make sure you end up with 5 sc each time.

The music was SO GOOD. I wish people would've saved clapping and cheering for in between songs, as I was there to HEAR the music. Lots of nostalgia washed over me as I listened. Particularly, I remember when my older brother was about to beat Ganondorf in Ocarina of Time. My entire family sat down on the couch and ate popcorn and cheered him on. It was a family event to play Legend of Zelda! So I always have good memories when I listen to that music. Ahhhhh...
Anyways, before I ramble too much, here's what I made.
This pattern is super flexible--I literally was winging it the entire time--so this pattern is more of a guide rather than a perfected pattern to making your own. I was working with stash yarn, so I made mine shorter than most Link hats. This is more Link to the Past looking.
Measure your
head beforehand to get an idea of how many stitches your final length needs to
be. I have a large head for a girl, and I needed 72 stitches in the end.
Note
that I made this with HDC stitches. You can either work in a spiral like me, or
use a tutorial on how to get a straighter seam while using HDC. Crochet Ever After has a good one.
**If you want the tail longer, do 2 of every HDC around row. It'll get adult Link cap size.**
H hook in green yarn
Round 1: 6 hdc in mc (6)
Round 2: *HDC, inc* x 3 (9)
Round 3: HDC around (9)
Round 4: *2 HDC, inc* x 3 (12)
Round 5: HDC around (12)
Round 6: *3 HDC, inc* x 3 (15)
Round 7: HDC around (15)
Round 8: *4 HDC, inc* x 3 (18)
Round 9: HDC around (18)
Round 10: *5 HDC, inc* x 3 (21)
Round 11: HDC around (21)
Round 12: *6 HDC, inc* x 3 (24)
Round 13: HDC around (24)
Round 14: *7 HDC, inc* x 3 (27)
Round 15: HDC around (27)
Round 16: *8 HDC, inc* x 3 (30)
Round 17: HDC around (30)
Round 18: *9 HDC, inc* x 3 (33)
Round 19: HDC around (33)
Round 20: *10 HDC, inc* x 3 (36)
Round 21: HDC around (36)
At this point I thought the “tail” of the hat was long
enough and added more stitches helter-skelter to fit my actual head.
Round 22: *5 HDC, inc* (42)
Round 23: *6 HDC, inc* (48)
Round 24: *7 HDC, inc* (54)
Round 25: *8 HDC, inc* (60)
Round 26: *9 HDC, inc* (66)
Round 27: *10 HDC, inc* (72)
Round 23: *6 HDC, inc* (48)
Round 24: *7 HDC, inc* (54)
Round 25: *8 HDC, inc* (60)
Round 26: *9 HDC, inc* (66)
Round 27: *10 HDC, inc* (72)
I wanted my hat to sit just behind my ears rather than snug
over the top of my head, so at this point I added just enough rows to sit an
inch away from my ears. The ribbing we add on will make up that last bit of
length. Add more or less rows to your taste.
Round 28-33: HDC around (72)
Ribbing can be longer or shorter depending on your
preference. I wish I had added one row of sc stitches before doing the ribbing
for a cleaner look, but the image above does NOT include the row of sc.
Round 34: Sc around
Ribbing begins
Row 35: Chain 6 (or desired length of ribbing plus 1 ch). Turn and sc into the second ch from your hook. Continue down the chain (back loops only) (5)
Row 36: Sc the next two stitches (on the hat, not on your ribbing) together. Turn without a chain and sc back up the ribbing ONLY in the back loops. (5)
Row 37: Ch 1, turn, and sc down the ribbing again only in the back loops. The last stitch tries to hide itself, so make sure you end up with 5 sc each time.
Repeat rows 36-37 until you have covered the entire brim of
your hat. You can fasten off and sew the edges together, or hold both ribbed
edges together and sc through them.
Good luck in making your own. It sure was fun to be one of the many Links in the audience. :)
Friday, January 16, 2015
Crocheting gifts and working on patterns!
I'm in progress with a new aspect of crochet--writing patterns. I've been amazed at how much harder it is to write down and explain a pattern than to just go go go and make something. I hope to have a Valentine's themed amigurumi up by next week, and then a cute spring critter after that. That Valentine's one is KILLING me though--I have three prototypes that are looking at me sadly from my crochet bag with wonky parts and pieces. But I'll keep trying, because I sketched it up and thought it was cute :)
Here are some projects I finished:

Another Toadette! My sister asked me to make her one for her birthday. I think it turned out alright, but now that I've seen Toad's Treasure Tracker, I wish I had made her in that cute khaki outfit! Her feet have been weighted so that she can stand on her own.
 A friend of mine had a cute, chubby baby in the fall and I made him a hat and shoes. Unfortunately, I gave it so late I don't think he could wear it... Oh well, it's the thought that counts! I also used a "crab stitch" for the finish. I like it, but it took me forever to figure it out!

Alright, alright, those Valentine headbands DO come in traditional colors, too.
And I forgot to post this proof that Emmy WILL wear some things I crochet!! Don't mind that I'm holding her hand away from pulling it off. :)

Back to the drawing board.
Here are some projects I finished:
Another Toadette! My sister asked me to make her one for her birthday. I think it turned out alright, but now that I've seen Toad's Treasure Tracker, I wish I had made her in that cute khaki outfit! Her feet have been weighted so that she can stand on her own.
Alright, alright, those Valentine headbands DO come in traditional colors, too.
And I forgot to post this proof that Emmy WILL wear some things I crochet!! Don't mind that I'm holding her hand away from pulling it off. :)
Back to the drawing board.
Wednesday, October 15, 2014
Crochet Your Costume - Roman Helmet
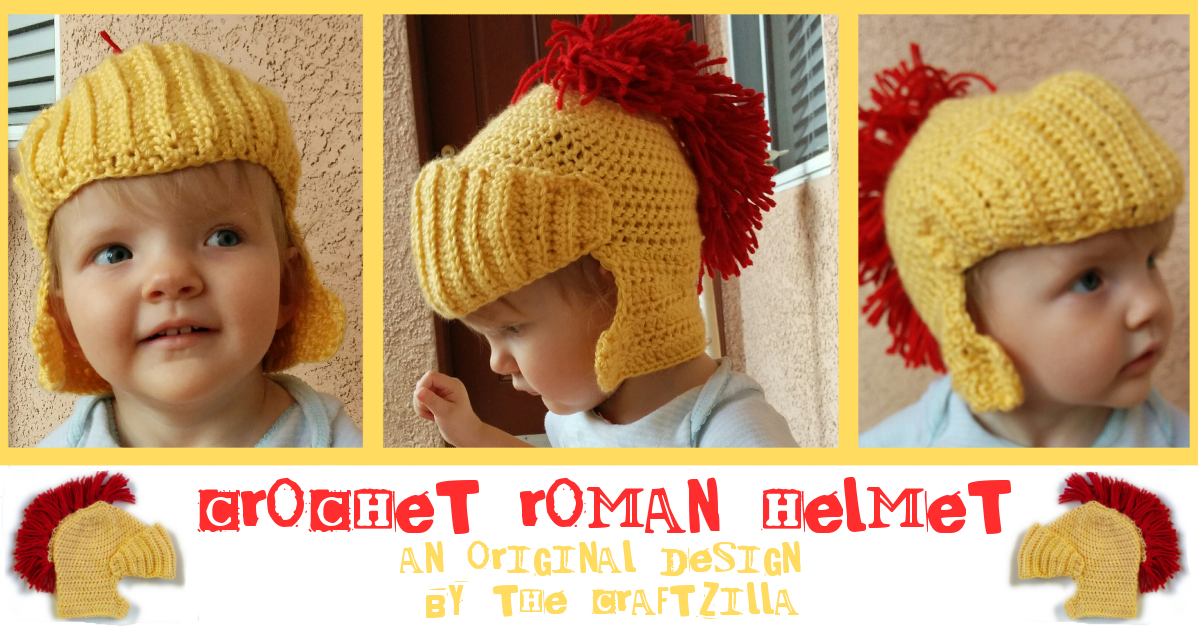
I regularly harass my friends with hat-wearing babies for something I can make them. Seriously, it fuels some deep need in me to frequently make and give away crocheted baby items just so I can feel fulfilled, rather than have it lay discarded in the closet by my daughter. So when one of my college besties mentioned their little boy was going to be a Roman soldier for Halloween, I had to leap at the opportunity.
Tuesday, October 7, 2014
Spooky Oooky Crafts for Halloween
It's month long Halloween aka OCTOBER! Halloween is the BEST. There's nothing I love more than to run around with the little ones gathering candy, then bailing at the end of the night with a bowl of white chili and The Legend of Sleepy Hollow (Disney version!) in the VCR.

So of course, I had to make some DIY decorations!
This past month has been a doozy--family emergencies, traveling, weird work schedules, a daughter who thinks she's a hoover vacuum and must eat everything on the floor-- so I really enjoy those moments when I can craft. But it's hard to make huge projects, so I've completed a few that you can get done pretty quick.

It's a pumpkin coaster! This took about 15 minutes and turned out really cute. You could add more rounds and make it a pot holder, or apply it as is onto a headband, shirt, etc for a pumpkin applique. I had to prove it wasn't useless by using it under my hot apple cider mug.
R: Ohhhh no, I don't want to ruin this table, but I need to set down this steaming hot apple cider~. What should I doooo~
G: *Sigh* Use...your coaster.
R: Wow! Thank goodness I just so happened to make one with my CARING, LOVING, CRAFTY hands.
Pumpkin coasters:
http://www.ravelry.com/patterns/library/crochet-pumpkin-coasters-pdf-pattern

There's something about tiny decorations--I love them. Easy to make, easy to store, and they just seem so dainty. These guys now reside by my candy bowl at work. I made a bunch of the little pumpkins for my friend who used them to adorn her wreath! (Now if she'll share a photo..or should I go to her house and take a picture of her door and leave? Not creepy at all, right?)
Baby pumpkin:
http://www.repeatcrafterme.com/2012/08/teeny-tiny-crochet-pumpkin-pattern.html
(I didn't use this pattern but it gives the same result.)
Ghost:
http://www.petalstopicots.com/2013/10/ghost-crochet-pattern/
(I gave him a ruffly bottom by increasing the stitches at the very end.)

You know how insanity is doing the same thing over and over again and expecting different results? Why do I keep making my daughter hats that she WON'T WEAR?? Luckily, they make great gifts to friends who have babiessmall enough they can't resist obedient enough to wear them for a two second photo shoot.

The ribbing on them makes them super warm, and the yarn I bought for them (I dub it "Ewok Orange") is soooo soft. (It's Hobby Lobby's "I Love This Yarn, by the way.) I finished a couple hats on a road trip because it is worked in rows and you don't REALLY need a pattern!
Punkin Hat:
http://www.favecrafts.com/Crochet-for-Baby/Baby-Pumpkin-Crochet-Beanie
Now when my sewing machine gets here Wednesday, I can start on the biiiig Halloween crafts--the Halloween costumes! :)
So of course, I had to make some DIY decorations!
This past month has been a doozy--family emergencies, traveling, weird work schedules, a daughter who thinks she's a hoover vacuum and must eat everything on the floor-- so I really enjoy those moments when I can craft. But it's hard to make huge projects, so I've completed a few that you can get done pretty quick.
It's a pumpkin coaster! This took about 15 minutes and turned out really cute. You could add more rounds and make it a pot holder, or apply it as is onto a headband, shirt, etc for a pumpkin applique. I had to prove it wasn't useless by using it under my hot apple cider mug.
R: Ohhhh no, I don't want to ruin this table, but I need to set down this steaming hot apple cider~. What should I doooo~
G: *Sigh* Use...your coaster.
R: Wow! Thank goodness I just so happened to make one with my CARING, LOVING, CRAFTY hands.
Pumpkin coasters:
http://www.ravelry.com/patterns/library/crochet-pumpkin-coasters-pdf-pattern
There's something about tiny decorations--I love them. Easy to make, easy to store, and they just seem so dainty. These guys now reside by my candy bowl at work. I made a bunch of the little pumpkins for my friend who used them to adorn her wreath! (Now if she'll share a photo..or should I go to her house and take a picture of her door and leave? Not creepy at all, right?)
Baby pumpkin:
http://www.repeatcrafterme.com/2012/08/teeny-tiny-crochet-pumpkin-pattern.html
(I didn't use this pattern but it gives the same result.)
Ghost:
http://www.petalstopicots.com/2013/10/ghost-crochet-pattern/
(I gave him a ruffly bottom by increasing the stitches at the very end.)
You know how insanity is doing the same thing over and over again and expecting different results? Why do I keep making my daughter hats that she WON'T WEAR?? Luckily, they make great gifts to friends who have babies
The ribbing on them makes them super warm, and the yarn I bought for them (I dub it "Ewok Orange") is soooo soft. (It's Hobby Lobby's "I Love This Yarn, by the way.) I finished a couple hats on a road trip because it is worked in rows and you don't REALLY need a pattern!
Punkin Hat:
http://www.favecrafts.com/Crochet-for-Baby/Baby-Pumpkin-Crochet-Beanie
Now when my sewing machine gets here Wednesday, I can start on the biiiig Halloween crafts--the Halloween costumes! :)
Wednesday, August 6, 2014
Every baby needs a panda hat, right?
Confession: Crocheting hats in the summer feels very rebellious. I must admit that with the 107 degree weather we recently had, crocheting ANYTHING feels kind of...stupid. But it's totally okay if it's something for a baby! Enter--The Panda Hat!

Tuesday, July 15, 2014
Toadette joins the race!
It seems appropriate that I love making cutesy hats, headbands, and hair accessories for my little girl...
And she hates them.
She pulls out her pony tails regularly, snaps headbands, and yanks off hats. But after playing Mario Kart 8, I couldn't resist making her a Toadette hat.


And she hates them.
She pulls out her pony tails regularly, snaps headbands, and yanks off hats. But after playing Mario Kart 8, I couldn't resist making her a Toadette hat.
Subscribe to:
Posts (Atom)